Greetings, fellow autumn enthusiasts and seekers of seasonal charm! It’s your guide, Drey, here to welcome you back to Steamy Kitchen for the grand finale of our beloved “Steamy Haunted” series. As the golden days of autumn usher in cooler temperatures and a craving for all things cozy, we’ve journeyed through a delightful array of seasonal inspirations.
We’ve savored the spooky season with tantalizing dishes from around the globe, transformed our dining spaces with elegant Halloween table decor ideas, and delighted our guests with spooktacular Halloween appetizers. Now, as the crisp autumn air whispers through the trees, I invite you to embrace the heartwarming magic of “kitchen witching” – a delightful term for crafting and DIY decor that celebrates the season’s natural bounty. This final installment is all about transforming your home into an autumnal sanctuary using simple, natural elements. So, let’s roll up our sleeves, explore our surroundings, and infuse our homes with the unique warmth and charm that only handmade fall decorations can offer. Get ready to gather, create, and bask in the enchanting glow of the season!

Before we embark on our creative journey, let’s set the perfect ambiance. Hit play on my favorite go-to spooky playlist (right here) and let those enchanting tunes bubble softly in the background. Crafting with a soundtrack enhances the experience, allowing you to fully immerse yourself in the creative flow. Remember, “kitchen witching” is more than just aesthetics; it’s about filling your space with positive, nurturing autumn vibes by harnessing nature’s abundant gifts. Ready to bring some delightful fall energy and natural beauty into your home? Let’s get started!
🍂 Foraging Fall Leaves for Enchanting Table Decor 🍂
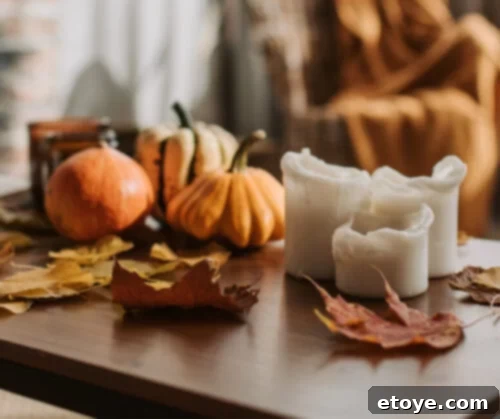
There’s an undeniable magic in the simple act of foraging. As autumn paints the landscape with a breathtaking palette of reds, oranges, and golds, venturing outdoors to collect fallen leaves is not just an activity, but a mindful experience. It connects us deeply with nature, encouraging us to slow down, observe, and appreciate the ephemeral beauty of the season. This cost-effective and sustainable approach to decorating allows you to infuse your home with unique, organic charm that no store-bought item can replicate.
The Joy of the Hunt: Discovering Nature’s Treasures
Don your coziest scarf and your favorite pair of boots, dear crafters! It’s time to venture into your backyard, local park, or a scenic walking trail on a quest for the most exquisite fall leaves. Look for leaves that boast vibrant, rich colors and a variety of shapes and sizes. Maple leaves offer broad, iconic shapes, while oak leaves provide a more elongated, rustic appeal. Seek out leaves with interesting textures and patterns, as these will add depth and visual interest to your arrangements. The goal is to gather a diverse collection that tells a story of the autumn landscape, allowing you to create truly unique and personalized decor.
Preparing Your Leafy Loot: Cleansing and Preserving
Once you’ve returned with your basket full of nature’s jewels, it’s crucial to prepare them properly to ensure their beauty lasts. Freshly fallen leaves can carry dirt, dust, and tiny insects, which we certainly don’t want indoors. For an extra layer of protection and to extend their lifespan, consider these simple steps:
- Cleansing Your Finds: Fill a sink or a large basin with cool water and add a generous splash of white vinegar. Gently swirl your leaves in this natural concoction. The vinegar acts as a mild disinfectant, helping to remove any lingering debris, mold spores, or tiny critters. After a few minutes, rinse them thoroughly under clean running water.
- Thorough Drying: Lay your cleansed leaves flat on a clean towel to air dry completely. For faster drying, you can gently pat them with another towel. Allowing them to bask in direct sunlight for a day or two can also help intensify their vibrant hues and ensure they are thoroughly dry, preventing any mold from forming.
- Optional Preservation Techniques: For leaves you wish to keep longer, consider these methods:
- Wax Paper Pressing: Place leaves between two sheets of wax paper and press with a warm iron (no steam), moving the iron constantly until the wax melts and seals the leaves. This creates a slightly glossy finish and preserves their color.
- Glycerin Treatment: Mix one part glycerin with two parts water. Submerge the leaves in the solution for several days or weeks until they feel pliable. Glycerin replaces the water in the leaves, keeping them soft and preventing brittleness.
Conjuring Autumnal Arrangements with Leaves
With your vibrant, clean, and perhaps preserved leaves ready, it’s time to unleash your creativity. Imagine each leaf as a tiny charm of happiness, carrying the blessing of autumn. Arrange them to whisper ancient stories of the trees and the playful dance of the wind. Scatter them generously across your dining table as a natural runner, create small piles around candles, or string them together to form a simple garland. Leaves can also be pressed and framed, or used to embellish placemats and coasters. Their versatility makes them a perfect centerpiece, radiating warm and cheerful spells to everyone gathered around your table. The simple elegance of natural leaves elevates any space, bringing the serene beauty of the outdoors inside.
Radiant Citrus Garlands: A Burst of Sunshine and Scent
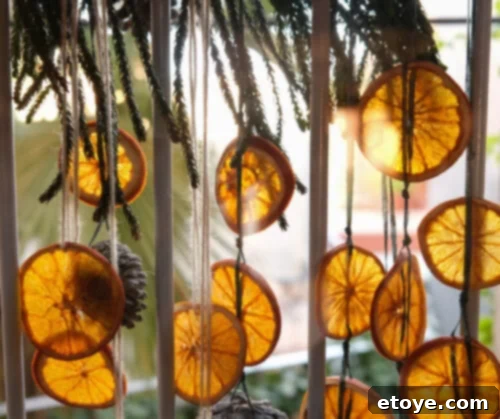
Embrace the vibrant energy of citrus with these effortlessly charming garlands. Not only do they add a pop of cheerful color, but their subtle, sweet aroma gently perfumes your home, creating an inviting and uplifting atmosphere. This DIY project is wonderfully simple, yet yields stunning results, making it a favorite for adding natural warmth to your fall decor.
Slice. Squeeze. Dry. The Art of Dehydrating Citrus
Begin by selecting your favorite citrus fruits. Sunny oranges, zesty lemons, and lively limes are all fantastic choices, each offering a unique hue and fragrance. For best results, choose firm, unblemished fruits. Wash them thoroughly and then slice them as uniformly and thinly as possible – about 1/8 to 1/4 inch thick is ideal. Thinner slices dry faster and become more translucent. Once sliced, lay each piece on a clean towel or several layers of paper towels and gently press to absorb any excess juice. This step is crucial for even drying and to prevent sticking.
Now comes the drying process, which can be done in an oven or a dehydrator:
- Oven Method: Preheat your oven to its lowest setting, typically around 200°F (93°C). Arrange the slices in a single layer on baking sheets lined with parchment paper. Leave them to dry for 2-4 hours, or even longer depending on their thickness and your oven. It’s vital to check on them every 20-30 minutes, flipping them occasionally, as they can burn quite quickly. Your kitchen will be filled with a delightful citrus wonderland scent! The slices are ready when they are firm, dry, and no longer tacky.
- Dehydrator Method: If you have a food dehydrator, simply lay your citrus slices on the dehydrator trays. Set the temperature to around 135°F (57°C) and let the magic unfold for 6-12 hours, or until completely dry and brittle. This method offers more consistent results and requires less monitoring.
Let’s Get Stringing: Crafting Your Citrus Garland
Once your citrus slices have transformed into beautiful, dried accents, it’s time to bring your garland to life! Gather some sturdy thread, jute twine, or even fishing line for a nearly invisible look, and a sharp needle. Carefully pierce each dried slice near the top edge and string them together. You can alternate citrus types, add cinnamon sticks or bay leaves for extra texture and scent, or even incorporate small wooden beads for visual breaks. The possibilities are endless!
Drape your fragrant garland wherever your space needs a little autumn cheer: across a mantelpiece, along a bookshelf, or adorning a window frame. Alternatively, simply arrange the dried slices in a decorative bowl with other natural elements like pinecones, acorns, or cinnamon sticks for a stunning, aromatic centerpiece. This easy, exciting, and wonderfully fragrant DIY project is a brilliant way to brighten up your fall decor with natural elegance. 🍊✨
Fall Stovetop Potpourri: The Art of Olfactory Comfort

Alright, lovelies, let’s talk stovetop potpourri – the understated art of summoning fall’s most intoxicating aromas into your home. This isn’t about complex spells, but rather a practical magic, a blend of nature’s finest ingredients coming together to fill your space with autumn’s warm embrace. It’s a straightforward path to a scented sanctuary, offering comfort and a gentle, inviting atmosphere that is quintessential to the season.
Step 1: Gather Your Autumnal Elixirs & Spices
Launch your quest by gathering these aromatic elements, each contributing to a rich, layered fragrance:
- Cinnamon Sticks: More than just their enchanting aroma, cinnamon is known for its warming properties and ability to evoke feelings of comfort and nostalgia. Its sweet, spicy scent is a cornerstone of fall.
- Orange Peels: The bright, citrusy scent of orange can uplift your spirit, driving away any lingering shadows of stress or anxiety. They add a burst of visual brightness and a fresh, zesty note to the potpourri mix.
- Apple Peels: Apple peels release a gentle, comforting fragrance, a whispered tale of orchard frolics and cozy kitchen baking. They add a sweet, fruity undertone that complements the spices beautifully.
- Whole Cloves: Cloves offer a deep, rich hint of sweetness and spice. They’re packed with antioxidants, and their potent aroma can make the air feel cleaner and more refreshing, adding an exotic warmth.
- Star Anise: This star-shaped spice releases a soothing, licorice-like scent that gently nudges away fatigue and brings forth a calm, grounding energy. Its unique shape also adds visual appeal to the mix.
- Optional Additions for Custom Scents: Feel free to experiment! Consider adding a few drops of vanilla extract for extra sweetness, fresh cranberries for a tart counterpoint, a sprig of rosemary for an earthy note, or even a few pine needles for a woody, forest-like aroma.
Step 2: Unleash the Gentle Magic
Fill a medium-sized pot (your “cauldron”) with water, leaving enough space for the ingredients. Place it on your stovetop over low heat. Add all your gathered offerings into the water. As the water gently simmers, it will slowly unfurl the fragrances, allowing them to waft freely and gracefully throughout your space. There’s no need for vigorous stirring; just let the natural process unfold. This subtle, soft dance of scents will gradually paint a portrait of fall within your walls, creating a truly immersive experience.
Step 3: Let the Fragrance Dance and Embrace the Warmth
Allow the aromatic brew to whisper across your realms, seeping into every corner of your haven. As the fragrant tales unfold, take a moment to breathe deeply and feel the comforting embrace of ancient trees, the gentle kiss of the autumn sun, and the serene dance of starlit nights. This is a sensory experience that grounds you in the present moment, connecting you to the natural world and the changing seasons. Let it be a daily ritual, a moment of calm in your busy day.
Bathe in the warm glow of these autumnal scents as they wrap your space in a tender, inviting embrace. This is the simple art of natural allure and comfort, a gentle nudge to the senses, reminding us of the earth’s enduring beauty and bounty. To keep the magic alive, simply add more water as it evaporates. You can reuse the potpourri for a day or two by refrigerating it overnight. When reheating, add a few fresh spices to revive the aroma.
And voilà! There you stand, amidst the magical mists and the tales spun by nature’s embrace, in the cozy comfort of your own enchanted realm. Enjoy the dance of fragrances, dear one, as you brew and bask in your very own fall stovetop potpourri magic. 🍂✨
Apple Tealight Holders: A Beacon of Autumnal Glow
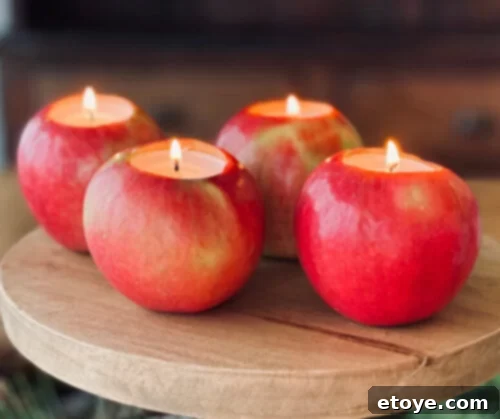
Now, onto one of my absolute favorite leaf-crunch season projects: the apple tealight holder. Imagine your home aglow with the soft, flickering light filtering through the ruby-red or golden-green flesh of fresh apples. It’s a scene straight from an autumn fairy tale, where magic hums in the cool breeze and every corner whispers secrets of the ancient earth. This simple yet enchanting craft adds a touch of natural elegance and a subtle, sweet aroma to any fall setting.
Here’s the Enchanting Spell:
Step 1: Choose Thy Apples Wisely
Opt for robust, hearty apples that stand firm and tall, serving as a vibrant beacon of the harvest bounty. Larger varieties like Gala, Honeycrisp, or Fuji are ideal, as they provide a stable base and ample space for carving. Their rich colors will also add to the aesthetic appeal. Select apples that are free of blemishes and have a nice, rounded shape to ensure they sit flat and cradle the tealights like precious gems in a velvet box.
Step 2: Craft the Holders with Care
With a sturdy spoon, a melon baller, or even a small paring knife, gently carve out the top of each apple, creating a cozy, perfectly sized nook for your tealights. The goal is to make a cavity deep enough to hold the tealight securely, but not so deep that it pierces the bottom of the apple. Be precise and gentle, dear crafters! We are creating a vessel of light, not a fruit salad. Preserve the integrity of the apple as you go about this delicate operation. You can also use a small cookie cutter to create a neat circle for easier carving.
Step 3: Secure the Light Within
Nestle the tealight snugly into the apple’s embrace. Ensure it sits level and stable. If the fit feels a bit loose, a toothpick or two inserted discreetly around the tealight can provide extra support, ensuring your source of light stands unwavering in its fruity throne. For added safety, especially if you have children or pets, consider using battery-operated LED tealights. They offer the same warm glow without the open flame, and you can reuse them year after year.
Step 4: Set the Scene for Autumnal Magic
Arrange these luminous orbs on your dining table, a cozy windowsill, a mantelpiece, or any spot yearning for a touch of autumn enchantment. Group them in clusters of three or five for a visually appealing display, or mix them with other fall elements like leaves, mini pumpkins, and pinecones. As the candle burns, the apple’s flesh will gently warm, releasing a subtle, sweet fragrance that mingles with the crisp air, adding an extra layer of cozy allure to your abode. Remember to always place your apple tealight holders on a heat-resistant surface and never leave burning candles unattended.
There you have it. A simple, yet utterly bewitching project to bring the radiant allure of fall right into your home. Remember, it’s all in the tiny details – a bit of light, a whisper of scent, and a whole lot of autumn love. This craft truly embodies the spirit of natural, homemade decor. 🍎🕯️
Dried Herb & Flower Racks: Rustic Charm and Earthy Aromas
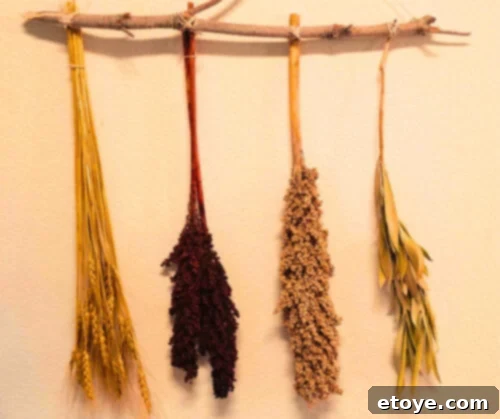
Here’s my own dried herb rack, created with an assortment of store-bought wheat and sorghum bundles. The stick and oleander branch were sourced right in my own backyard!
Now let’s traverse the path of ancient knowledge with a craft that’s as practical as it is enchanting – making dried herb or flower racks. This project brings a touch of rustic, cottagecore, or bohemian elegance into your home. Imagine a sturdy, natural stick cradling bunches of fragrant herbs or delicate dried flowers, suspended in your kitchen or living space, whispering tales of the wild and infusing your home with earthy, natural scents. This decor piece is not only visually stunning but also functional, allowing you to dry herbs for culinary use or simply to enjoy their preserved beauty.
Embark on the Foraging Quest: Gathering Your Materials
Step 1: Seek the Perfect Stick or Branch
Embark on a mindful quest in your backyard, a local park, or a nearby wooded area to seek the perfect stick or branch. Look for one that is sturdy, relatively straight, and has interesting natural textures. A length of 1 to 3 feet usually works well, depending on where you plan to hang it. Embrace the caress of the chilly autumn breeze and listen to the murmurs of the fallen leaves as you claim a piece of the wilderness to grace your home. Once collected, clean your stick thoroughly by brushing off any loose dirt or debris. For a more polished look, you can gently sand it or even seal it with a clear, non-toxic varnish, though its natural state is often part of its charm.
Step 2: Gather Thy Botanicals for Drying
As you roam, keep your eyes peeled for herbs, flowers, or other plant parts that call out to your soul. Fragrant rosemary, delicate lavender, aromatic eucalyptus, vibrant wildflowers like yarrow or statice, and even hydrangeas are excellent choices for drying. If the wild doesn’t yield what you seek, your local grocery store or florist is a treasure trove waiting to be explored, often offering bundles of dyed or undyed sorghum, millet, wheat, or dried lavender. For herbs, harvesting them just before they flower typically yields the most potent aroma. Gather your botanicals in small bunches, as this promotes better air circulation and more even drying.
Step 3: Assemble the Rustic Rack
Back in your cozy coven, prepare your gathered botanicals by trimming any excess foliage from the stems. Using natural twine, cotton string, or even thin ribbon, tie your small bunches of herbs or flowers securely. Leave a long tail of twine on each bundle. Then, lay your chosen stick horizontally and begin tying your gathered botanicals to it, allowing them to hang upside down. Hanging upside down helps to maintain their shape as they dry and prevents the essential oils from dripping out of the leaves. Space them evenly for a balanced look, or cluster them for a more abundant feel. Feel the joy of creation as you craft harmony and beauty in every knot and loop, arranging them until your rack is bursting with natural charm.
Step 4: Find the Ideal Spot for Display
Once assembled, suspend your rack in a spot where it’s not just seen but felt. A kitchen wall, above a mantelpiece, near a sunny window (but out of direct, harsh light to prevent fading), or in an entryway are all ideal locations. The best spot is typically one with good air circulation to aid in the drying process. Let it be a living artwork, a conversation starter, and a daily reminder of nature’s bounty and beauty. As the herbs and flowers slowly dry, they will release their gentle fragrances, infusing your home with the subtle, earthy tales of autumn. Dust occasionally to keep it looking fresh, and when the scents begin to fade, you can refresh them with a spritz of essential oil or replace the bundles with new seasonal finds.
In this humble craft, you’re not just creating a decorative piece. As you craft this rustic relic, know you’re threading tales, memories, and a dash of delightful drama into the saga of your space, celebrating the timeless allure of nature’s artistry. 🌿🌸
—
And so, my dear companions on this autumnal journey, we’ve reached the end of our “Steamy Haunted” series. We’ve gathered vibrant leaves, crafted radiant citrus garlands, infused our homes with the intoxicating aromas of stovetop potpourri, illuminated our spaces with the gentle glow of apple tealights, and brought rustic charm indoors with dried herb and flower racks. It’s the little things, the whispers of old tales in the wind, the warmth of a spiced potpourri, and the soft flicker of candlelight that make this season so utterly bewitching.
As the leaves continue their graceful descent and the nights grow longer, let’s carry this magic with us, not just in our homes but in our hearts. Embrace the spirit of creativity, the connection to nature, and the simple joys of slow living that autumn so beautifully embodies. Until we meet again next year, keep finding joy in the whispers of the wind, the rustle of leaves, and the comforting warmth of homemade decor. Stay spooky, stay cozy, and keep that enchanting magic alive in your hearts and homes. Thank you for joining me on this wonderful adventure, lovelies! See you next season! 🍂💫
