Unlock the secret to an abundance of fresh, juicy strawberries with a propagation method that’s both brilliantly simple and incredibly effective. If you’re passionate about soilless gardening, particularly aquaponics or hydroponics, you’re in for a treat. This guide will walk you through a unique, cost-efficient, and highly successful technique for propagating strawberry runners directly within your system, eliminating the mess and complications of traditional soil-based methods. Imagine a continually expanding strawberry patch, overflowing with sweet berries, all grown sustainably and efficiently right in your backyard or greenhouse.
For many gardening enthusiasts, the joy of harvesting fresh produce is unmatched. Strawberries, with their vibrant color and delightful flavor, are often a prized crop. However, maintaining a thriving strawberry patch requires consistent expansion and replacement of older, less productive plants. Our method offers a seamless way to achieve this, ensuring a steady supply of new, vigorous plants ready to bear fruit. In our own garden, the berries disappear almost as quickly as they ripen, often becoming impromptu snacks for our youngest garden inspector, necessitating a constant need for more plants!
Revolutionizing Strawberry Propagation for Soilless Systems
Traditional methods for propagating strawberry runners typically involve rooting new plantlets in small pots filled with soil. Gardeners often use clips or weights to hold the runner in place until it develops sufficient roots to sustain itself. While effective for conventional gardening, this approach presents significant challenges for aquaponic or hydroponic systems. The primary hurdle is the need to meticulously remove all soil from the newly rooted plant before introducing it to a soil-free environment. This extra step is not only time-consuming but also risks stressing the delicate root system and potentially introducing soil-borne pathogens or contaminants into your pristine aquaponic or hydroponic setup. We sought a cleaner, more integrated solution.
Our innovative approach bypasses the soil entirely, streamlining the propagation process for soilless cultivation. Instead of soil, we leverage a simple plastic bag as a mini-container and a specialized grow plug as the moist rooting medium. This method ensures that your new strawberry plants are ready for transplant into your aquaponics or hydroponics system without any intermediate steps, minimizing transplant shock and maximizing success rates. It’s a game-changer for anyone looking to efficiently expand their strawberry cultivation in a clean, controlled environment.
Essential Materials for Soilless Strawberry Propagation
Gathering the right tools is the first step towards a successful propagation. Fortunately, the items required for this method are readily available, inexpensive, and easy to acquire. Each component plays a crucial role in creating the ideal environment for your strawberry runners to develop robust root systems, preparing them for their new life in your aquaponic or hydroponic garden.
A “U” Shaped Piece of Wire
This simple wire acts as an anchor, securing the delicate strawberry runner within the grow plug. You can easily fashion one from a coat hanger or purchase pre-bent garden clips. The key is to have a sturdy yet pliable piece of wire that can hold the runner firmly without damaging it. Its “U” shape allows it to straddle the runner and gently press it into the grow plug, ensuring good contact and stability during the critical rooting phase. Look for wire that is resistant to rust, especially since it will be in a moist environment.
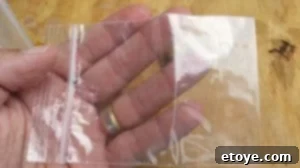
A 3×4 Inch Plastic Bag
These small, sealable plastic bags serve a dual purpose: they act as a mini greenhouse, maintaining high humidity around the grow plug, and as a small water reservoir. The 3×4 inch size is ideal, providing just enough space for the grow plug and a small amount of water without being cumbersome. We found these conveniently in the craft section of a local store, often sold in bulk, making them a very economical choice for propagating multiple runners. Ensure they are clean and free from any residues before use.

A Quality Grow Plug
Grow plugs are the heart of this soilless propagation method. They provide the perfect balance of moisture retention and aeration crucial for root development. While various brands and materials exist, such as rockwool, coco coir, or Oasis cubes, we’ve had excellent results with plugs like those from Agrotech. Smaller options, such as Root Riot plugs, are also highly effective and may even offer a slightly better fit within the plastic bags due to their compact size. Choose plugs specifically designed for cloning or propagation, as these are typically sterile and formulated to encourage rapid root growth.

And of Course, a Healthy Strawberry Runner
The star of the show! A healthy runner is identifiable by its small, undeveloped plantlet at the end, often with tiny leaves and sometimes nascent root nubs. Select runners that are vigorous and attached to a strong, productive mother plant. Look for a plantlet that appears robust and free from any signs of disease or pest damage. The healthier the runner, the higher your chances of successful propagation and a thriving new strawberry plant.
Step-by-Step: Propagating Strawberry Runners in Aquaponics or Hydroponics
This propagation technique is remarkably straightforward, making it accessible even for beginners. By following these steps, you’ll be well on your way to a thriving strawberry patch, efficiently expanded through your aquaponics or hydroponics system.
Step 1: Prepare Your Grow Plug
Begin by taking your chosen grow plug and carefully splitting the top section. The goal is to create a small, shallow slot or incision in the center of the plug. This slot will gently cradle the base of the strawberry runner, providing a stable and secure position for it to root. Ensure the split isn’t too deep, just enough to snugly fit the runner without completely bisecting the plug.
Step 2: Hydrate the Grow Plug
Once the slot is ready, submerge the grow plug in a small container of water. Allow it to soak thoroughly until it is completely saturated. This step is crucial for providing the initial moisture necessary for root development. For optimal results, use clean, dechlorinated water, and if you’re in a hydroponic or aquaponic system, ensure the water’s pH is balanced (typically between 5.8 and 6.5 for strawberries) to create an ideal environment for the roots. A well-hydrated plug will feel soft and spongy.
Step 3: Position the Strawberry Runner
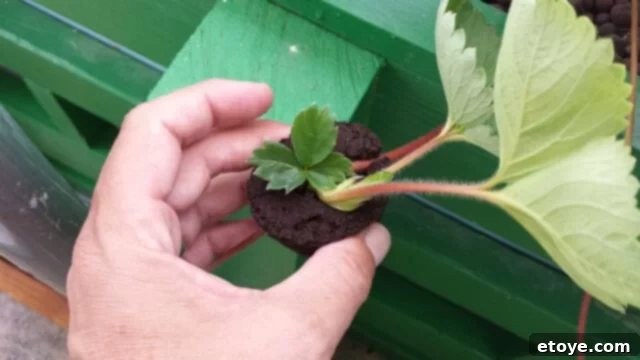
Gently take your chosen strawberry runner and place its base into the slot you created in the grow plug. Pay close attention to the orientation of the runner. If there are already small, nascent roots (often appearing as tiny pink and white nubs), ensure they are pointed downwards, towards the grow plug, where they can continue to grow into the rooting medium. If the runner has not yet developed any visible roots, position the plantlet so that its leaves are facing upwards, allowing it to photosynthesize effectively while it focuses on root production. Handle the runner with care to avoid damaging the delicate plantlet or any existing root structures.
Step 4: Secure the Runner with Wire
To keep the strawberry runner firmly in place and ensure good contact with the grow plug, take your “U” shaped piece of wire. Carefully insert it across the base of the runner, pushing its ends down into the grow plug. This wire acts as a gentle clamp, holding the runner securely within the slot and preventing it from shifting. It also helps to keep the grow plug’s split intact, maintaining its structural integrity while the roots establish themselves. This simple step provides crucial stability for the new plantlet.
Step 5: Create the Mini-Reservoir and Humidity Dome
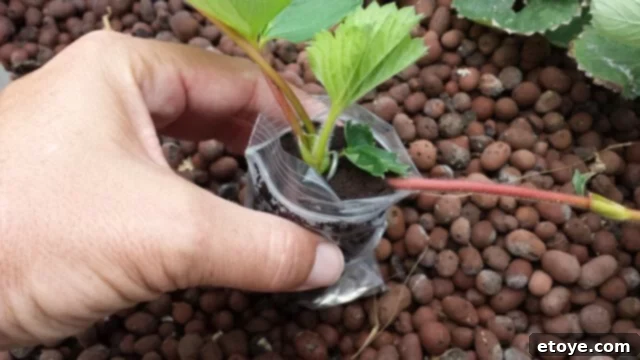
Now, take one of your small plastic bags and add a small amount of water to the bottom – just enough to create a shallow pool, typically about half an inch deep. Carefully insert the grow plug, with the runner secured, into the bag. Larger grow plugs, like the Agrotech ones, often fit quite snugly, which is beneficial as it holds the plug upright. If you’re using smaller plugs, such as Root Riot, they may slip in more easily. The bag serves two vital functions: it creates a mini-reservoir for the grow plug to wick water from, and it acts as a humidity dome, trapping moisture around the plantlet to encourage rapid root development.
Step 6: Strategic Placement for Root Development
Finally, place your assembled propagation unit – the bag containing the grow plug and runner – in an appropriate location within your aquaponics or hydroponics system. You can either set it directly on the surface of your grow media (like clay pebbles or rockwool in an ebb and flow or DWC system) or allow the entire unit to hang over the edge of your grow bed or reservoir. The key is to ensure the runner receives ample light, which is crucial for photosynthesis. However, be mindful of the runner cord connecting the new plantlet to the mother plant; ensure it is not kinked or cut by the edge of your system, as this connection is vital for nutrient supply during the initial rooting phase. If using smaller Root Riot plugs, you might find it helpful to tie a piece of string vertically around the center of the bag and plug to keep everything compact, or use a rubber band horizontally around the bag to hold it tightly to the grow plug, preventing it from tipping over.

Observing Growth and Preparing for Transplant
One of the most rewarding aspects of this method is the speed at which roots develop. With optimal conditions, you’ll be amazed to see new roots emerging from the grow plug in as little as three days! This rapid growth is a testament to the efficient environment created by the grow plug and mini-humidity dome, providing consistent moisture and aeration directly to the nascent root system. Healthy roots will typically appear white and fibrous, growing vigorously through the plug material. This quick establishment significantly reduces the overall time from propagation to a mature, fruit-bearing plant.
When to Transplant Your New Strawberry Plants
The ideal time for transplanting occurs when the roots are well-established and clearly visible throughout the grow plug, indicating that the plantlet can independently sustain itself. While you might see roots in a few days, allowing them a bit more time to grow into a dense network within the plug will further reduce transplant shock and ensure a smooth transition into your main system. We often let ours develop for a week or two, depending on the vigor of the runner and environmental conditions.
When you’re ready to transplant, the process is simple:
- Sever the Runner Cord: Using clean, sharp scissors or pruning shears, carefully cut the runner cord connecting the new plantlet to the mother plant. Make a clean cut as close to the mother plant as possible without damaging it.
- Remove the Plastic Bag: Gently slide the plastic bag off the grow plug. The roots should hold the plug together, so no need to worry about it falling apart.
- Integrate into Your System: Carefully insert the grow plug, with the rooted strawberry plant, directly into your aquaponics or hydroponics system. This could be into a net pot filled with inert media, directly into a grow bed, or any other setup suitable for your system. The goal is to cause minimal disturbance to the newly formed root ball.
Important Considerations for Ongoing Success
- Multiple Runners: If your mother plant is producing a line of multiple runners, wait to cut the main runner cord until the last plantlet on that line is ready for transplant. Each plantlet draws nutrients from the mother plant through the runner cord, and detaching it too early can hinder the development of subsequent plantlets.
- Moisture Monitoring: Keep a close eye on the moisture level of your grow plugs, especially if they are exposed to direct sunlight or warm temperatures. Plugs tucked away under the leaves of a mother plant might retain moisture longer, but those in open, sunny conditions (like the hot Florida sun we experience) will require additional water. A quick check daily to ensure the plug feels consistently damp, but not waterlogged, is recommended. You can add a small amount of pH-balanced water to the bag if it appears to be drying out.
- Nutrient Solution (Hydroponics): If you are propagating in a hydroponic system, you might consider using a very diluted nutrient solution (e.g., 1/4 strength) in the plastic bag instead of plain water once the first roots appear. This can give the plantlet an additional boost. For aquaponics, the fish water itself provides the necessary nutrients.
- Environmental Factors: Ensure consistent access to light for optimal photosynthesis. While the bag creates a humidity dome, good air circulation around the outside of the bag can prevent mold or mildew issues, especially in humid climates.
By following this detailed guide, you’ll not only master the art of soilless strawberry propagation but also ensure a continuous cycle of fresh, homegrown strawberries. This method is a testament to the efficiency and innovation possible in modern gardening, bringing the joy of a perpetually expanding strawberry patch right to your aquaponics or hydroponics system. Happy growing!
